|
Thursday, 15 July 2021
quote [ The system comprises 4x SFX-100 (Actuator) + SimFeedback (PC Software + Arduino Firmware) system. As opposed to a commercial system, this is a DIY system. You need to build the actuators, wire up the controller, flash firmware and setup. ]
Holy fucking shit. It's an SFX platform guys... F... not E. F!
How does it work?
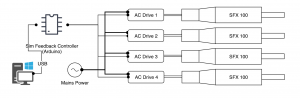
4 actuators, a controller, and the SimFeedback software The system comprises 4x SFX-100 (Actuator) + SimFeedback (PC Software + Arduino Firmware) system. As opposed to a commercial system, this is a DIY system. You need to build the actuators, wire up the controller, flash firmware and setup. This is a ?Platform mover? design. In that the platform moves on 4 actuators, allowing for Roll, Pitch and Heave motion. These in turn allow you to get Surge and Sway simulated effects. These combination of movements will allow you to get ?motion cues? ? the surface of a race track getting bumpy into a braking zone, the ripple on a rumble strip, clipping a sausage curb, hitting the brakes, gear shifts, rubbing paint with other cars. The SimFeedback software also has output for sound based effects through a soundcard, such as RPM vibration. Turning telemetry into motion signals In order to generate motion, SimFeedback receives telemetry (via an open source plugin system) from the game and translates the telemetry into actuator positions at high frequency. A range of configuration options determines how that translation happens. For example: Under hard braking the games physics engine has determined that there is a negative acceleration value of -1.2G, this would be sent out of the game on the ?AccelG? variable. SimFeedbacks reads that value and sends to the effect(s) that are using that variable. Normally this would be the ?Surge? effect, -1.5 might correlate to -12% on the setpoint graph. This would be the target the actuator(s) need to move to based on various settings and the actuators previous position. The better physics telemetry output from your game engine, the better the experience in your SFX rig will be ? from game to game the accuracy of the physics varies quite a bit in terms of what they calculate and send, the better it is the more ?alive? your rig will feel. Signals into actuator movements The motion output is sent to an Arduino running some custom SimFeedback firmware . The Arduino is wired to each of the AC Servo Drives. Each of these drives (powered by 220v AC) in turn sends signals to their respective Servo Motors on top of each SFX-100 actuators. The servo rotates clockwise/counterclockwise, this translates into linear (vertical) travel via a standard ball screw ? and in turn moves each corner of your sim rig up/down. Note: This is a Closed loop system with no limit switches or calibration required. This keeps the system both fast and simple. SimFeedback is designed to always be started with the actuators from a fully lowered position, when the Start button is pressed it moves the actuators to a known assumed start position. Here?s a diagram of the complete system The SFX-100 Actuator Thanks to 3D printing you can build your own The SFX-100 Actuator is an open source design that you can build yourself. We supply you the parts list, suggested suppliers and the .STL files for 3D printing. Aside from the 3D printed pieces everything else can be built in your regular DIY/maker garage. For the majority of builders so far 3D printing is new to them and (from the authors experience) is fun and easy to learn. We?ll help you along with that. The actuator is incredibly powerful. Topped with 750watt servo motors, there?s 3kW of available power to move your sim rig. Thankfully for your power bills they are incredibly power efficient (more on that later) and require a lot less power in operation. There is virtually no backlash, and they are relatively quiet in operation. The beta testers have seen 9+ months rigorous usage with no noticeable wear. Thanks to the open source design should anything happen in future you either print new parts and/or order off the shelf replacement components. Below a parts diagram of an un-assembled actuators. Please note 6 screws and an o-ring are missing from this photo. Servo Motor Bolts for servo drive to mount 3D Printed Motor Mount 3D Printed fixed bearing carrier Helicoils and bolts for Fixed bearing into Extrusion 100�100 Extrusion T-Slot nuts for rig mounting brackets Bolts and helicoil for linear carrier 3D Printed Linear bearing mount Cabling from Servo drive to Servo Coupler Fixed bearing nut 1605 Ballscrew Fixed Bearing 3D printed bumpstop 3D Printed Slider Hollow stainless shaft Linear Bearing Foot Linear Bearing Bolts AC Servo drive Linear bearing bolts Power Consumption 3kW Maximum possible, in reality a lot less Whilst the system has 4x750watt motors, that is their maximum power consumption. In practise the system is very efficient. A number of testers have reported not seeing over 500w total power consumption (all 4). The amount of power will be relative to the load the system is under; for instance with an approximately 170kg load author was seeing 50watts to hold the rig at the start position, 70-90watts gentle track surface, 200watts F1 car rough track surface, 300watts crashing. Your own figures will vary ? the more weight the actuators have to move, the more power consumed. Rest assured it?s not drawing 3kW from an outlet constantly. Video showing at the wall power consumption of the 4 actuators : Important items to understand This is not quite Ikea, we are using industrial components... This is not Ikea level of DIY. This guide is not a ?paint by numbers? in that there will be points that you will need to fill in the gaps, devise your own solution for problems you encounter and/or seek google help. You should familiarise yourself with components if you?re not already familiar with them. This project assumes a level of mechanical DIY/proficiency as you are building something that will easily move 200kg of rig very quickly. If in doubt research forums to see others experiences. Mains voltage wiring. The AC Servo Drives do not come wired with mains power plugs. They have connections for single and three phase mains voltage inputs. As every countries laws and requirements are different for obvious reasons we?re not going to advise you on what to do here. Caution ? Mains voltage can kill ? please take this part of the build very seriously. We strongly suggest you consult a qualified electrician, and have an isolating device such as an RCD to reduce risk. Housing the AC Servo Drives. There?s 4 drives plus a controller, and however you achieve your mains wiring (eg including transformer etc) you?ll need to house this safely. You?ll need to design/adapt your own housing for all this, there is all sorts of weird and wonderful creations on forum threads. Your preferred Arduino housing solution. We give you a basic breadboard suggestion, which is functional. You?ll need to do the final wiring/mounting. There?s various options for this. Mounting the actuators to your rig. As everyones rig is slightly different numerous options exist for mounting, commonly this would be using a 40mm 90 degree t-slot bracket x 4 for each actuator. Noise The AC Servo Drives emit a high frequency whine, the majority of users are not troubled by it and is not noticeable under motion. There is a small %age of users (approx 1-2% without a formal survey) who find the whine very uncomfortable under motion. If a solution is found this page will get updated. Please note that high frequency noises can be common amongst servo drives and servos as they are typically designed for industrial environments ? there are other DIY projects where this happens. Safety caution High voltages, fast servo motors, what could go wrong? Like a direct drive wheel, a motion sim platform is not a toy. While they?re awesome fun you do need to take care. The motors are incredibly powerful and don?t know to stop if somethings wrong ? there is some protections for this in the servo drives, don?t count on the rig stopping unless you tell it to stop. Always start and stop from a fully lowered position Make sure there?s good clearance around the rig for full movement + safety margin for when it moves** Make sure all cables are clearly away from moving parts Make sure no small children/animals can play around the rig while it?s moving. Do NOT have any part of your body under the rig while the actuators are moving or at a raised holding height. If there?s any issue (eg a power surge) 100+kg of rig will come down on top of you very quickly. ** Not if but when depending on your floor substrate, intensity levels, motor speed and what you?re racing. The author has seen his rig move 100mm in a particularly intense F1 racing evening on a concrete floor.
|
Comments
|
macst34 said @ 8:42am GMT on 15th Jul
[Score:1 Classy Pr0n]
with some slight modifications, shouldn't be any trouble to mount a 4 post ikea bed to this for your other platform.
|
|
lilmookieesquire said @ 3:51pm GMT on 15th Jul
IT'S FOR LEGITIMATE HOBBIES! THAT IS AN F!!!
|
|
cb361 said @ 4:50pm GMT on 15th Jul
[Score:1 Interesting]
My "Ride your stionary-bike around in computer games" project has nearly reached alpha version. If anybody would like to help out by testing it, please let me know.
|
|
lilmookieesquire said @ 9:32pm GMT on 15th Jul
I'll bite
|
|
cb361 said @ 11:06pm GMT on 15th Jul
Cheers. I’ll PM you when it’s testable.
|
|
lilmookieesquire said @ 4:41am GMT on 16th Jul
Please do :)
|
|
lilmookieesquire said @ 3:35am GMT on 15th Jul
This isn't me in the post btw...
also, see it in action here (also, not me) https://www.reddit.com/r/simracing/comments/ojrj88/finally_finished_converting_my_playseat_sensation/ |
steele said @ 12:54pm GMT on 15th Jul
|

Post a comment
[note: if you are replying to a specific comment,
then click the reply link on that comment instead]You must be logged in to comment on posts.